Lightweight Mouldings
Lightweight MouldingsExterior Mouldings
Exterior MouldingsPlaster Mouldings
Plaster MouldingsFireplaces & Stoves
Fireplaces & StovesCast Iron Radiators
Cast Iron RadiatorsFREE delivery on online orders over £200 from lightweight range

Company


Inspiration

Help & Advice

Special Offers
Wall panels evoke style and create character within any home. From the grandest of Victorian and Edwardian properties to modern minimal new builds, wall panels can give your interior the wow factor.
Our collection of wall panels and 3D wall panels will give your walls an instant lift and enrich your space with either decorative or simplistic mouldings. Finished with a white primer, our wall mouldings are easy to install and ready for that final touch of paint in order to reflect the existing colour palette of your room.
In this article, we will show you how to create and fit a wall panelling effect using our panel mouldings. We will also highlight the tools you will require and how to apply adhesives.
Before you start glueing panels to your interior walls, we recommend storing your panels and adhesives at room temperature and waiting 24 hours before installation. We promise you’ll get the best results this way!
Everything you need in order to install wall panels correctly is listed below.
Our dado rails and wall panel mouldings have endless design opportunities and can be used to create a variety of panel styles including a floor-to-ceiling panel effect.
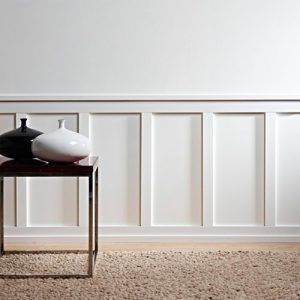
The image below shows a wainscotting or shaker style wall panel design using our SX157 panel moulding
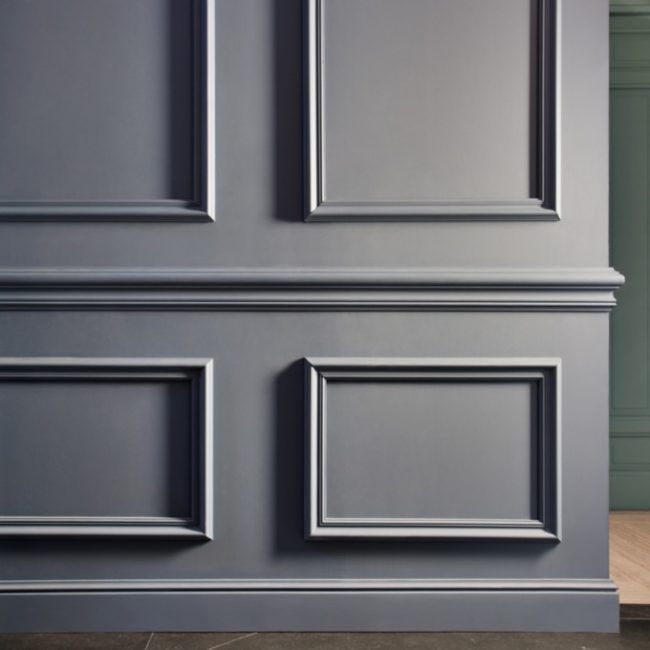
The image below shows a more classic wall panel design using our Orac P8050 dado rail and PX175 wall panel moulding.
Before you start, make sure your wall surfaces are flat, dust free, sanded down and grease-free. If you can tick the above off your checklist, you’re good to go!
Before you start fitting your dado rails onto the wall, protect your floors and lay tarpaulin down or a plastic sheet. This isn’t a necessity but it helps with the final clean up plus, you’ll be relieved that your flooring is still in good condition and dust free after your DIY efforts.
Our dado rails and wall panelling are mostly supplied in 2-metre lengths therefore you’ll need to decide how high you’d like the panels to sit and the style of panelling you wish to create before making any markings. Once you’ve decided on the style and height, take your measuring tape and start marking up your walls.
Wainscotting / Shaker Style Wall Panelling
Choose what height you want to make panel and decide on which moulding you are using. Measure the length of your wall and decide on number of panels you would like to have. Once you know the number of panels, you will know how many vertical lengths you will need. Multiply this by the width of your moulding then deduct from your wall length. You will then have the width of each space in between the vertical mouldings.
The Inch Calculator wainscotting guide is an easy to use calulator and will also give you a visual of your panel layout.
Classic Style Wall Panelling
If you are using a dado rail and skirting board, install these first then use them as the guide to your panel height. Wall panels can be rectangular or square so try to decide on your preferred shape then once you have your wall measurements, decide on spacing between each panel. The gap between the bottom of the dado rail to the top of panel should be the same as the gap from the top of your skirting to the bottom of the panel. The gap between each panel, on its width, can really be whatever you want but would normally be from around 10cm. This is a variable measurement so once you work out preferred gap, you can then calculate width of each panel to suit your wall length.
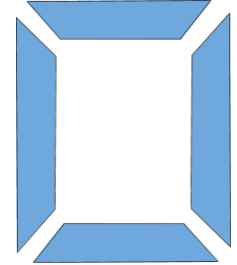
The mouldings will need to be cut and mitred at a 45-degree angle in order to create the rectangular or square panel effect. Please see the example below for reference.
After you’ve got your measurements, we’d recommend marking the rest of your walls with tape or light pencil marks as a design guide. This will allow for easier installation as you are just sticking the panels on top of your original markings.
Once you’ve got your measurements, make sure you set the mitre box to the right angle size and direction. Place your dado rails or panel moulding into the mitre box and start cutting!
For every panel make sure you repeat the steps mentioned above to ensure your match your measurements.
Top tip: Make sure you secure the panels into the mitre box to avoid disruption and movement during sawing. This will ensure a clean and smooth finish.
Once you’ve got all your panels cut, check that the corner pieces fit together before fixing them to the wall.
Orac dado rails/wall panels are made of a lightweight duropolymer therefore no screws are required to fit your panels to the wall. There are various adhesives available to fit Orac wall panels and you’ll need two adhesives to create your final look – one to fix the panels to your existing wall structure, and one to join two wall panels together for example, for joints and corners.
We’ve listed three Orac adhesives that you could choose from. Each adhesive comes in various sizes in order to meet the needs of your project.
If you’re more of a visual learner, we’ve got you covered, we’ve attached Orac’s step-by-step video below. This takes you through every step and shows you exactly what you need to do in order to create that detailed wall panel effect you’ve been longing for.
View our full range of ‘wall panels‘.

27th July 2020
Wall panels are both decorative and functional. They are perfect for creating character within the interior of your home. Our...
Wall Panel Inspiration
3rd November 2022
Ceiling designs have seen some interesting trends over the years, from popcorn ceilings to skip trowels, these trends were mostly...
How To Transform Your Ceilings Within a BudgetYou've selected some products for comparison. Click here to compare the products you've selected.
View Products")
")
")

")


