Lightweight Mouldings
Lightweight MouldingsExterior Mouldings
Exterior MouldingsPlaster Mouldings
Plaster MouldingsFireplaces & Stoves
Fireplaces & StovesCast Iron Radiators
Cast Iron RadiatorsFREE delivery on online orders over £200 from lightweight range

Company


Inspiration

Help & Advice

Special Offers
Installing coving is a fantastic way to create a lovely finish for any room and conceal the edge between the wall and ceiling. We’ve created a simple yet detailed DIY guide to help you with the installation and cutting of our lightweight coving to create those lasting finishing touches to your interior.
Our lightweight range of cornices and covings are available in varying sizes, designs, and are affordable on a budget making sure that we have something that’ll can suit your home’s unique interior décor. We have styles to suit all homes from small coving for modern built properties to larger cornices for traditional period homes. You can create truly remarkable interior designs, especially if you combine coving with lightweight ceiling roses (don’t worry, we have a guide on how to install ceiling roses too).
We have step-by-step video guides for cutting coving, showing you how to carefully mitre and install the internal and external corners of coving.
Fortunately, you don’t have to bring in a professional to help you with fitting your coving. Often it can be a relatively simple task that can be undertaken as a DIY project, with it being installed quickly and easily.
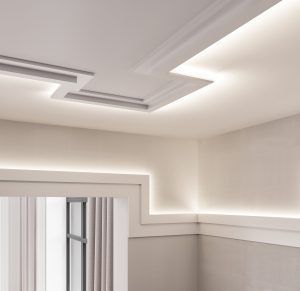
Modern lighting coving
Whatever size of coving you choose, the installation and cutting of internal and external coving mitres is done in exactly the same way. Our installation guides and videos are designed to help you fit your coving with ease and achieve the best possible finish. We also sell all the adhesives, mitre boxes & tools required for your job.
Read on for a simple guide on how to fit your coving and cornice.
You will require the following items to fit your coving without any issues:
Before you start fitting your coving it helps to protect your floor by laying tarpaulin or a plastic sheet. You could also wear protective gloves to protect your hands and stay safe. These are more precautionary than absolutely necessary.
Marking lines are required to be added to the wall and ceiling so it’s clear where the coving should be placed. To find out where these should be, read the instructions from the manufacturers as they will provide exact measurements.
If for example the coving should be placed 83mm down the wall and 83mm onto the ceiling (measured from where the ceiling and wall meet) then carry out the measurements and add marks to the wall at these points at roughly one metre intervals. Once complete, use an object with a straight edge to join them (a spirit level would be useful here).
A chalk line can also be used. After the measurements have been carried out and the marks added onto the wall and ceiling, lightly hammer in a panel pin at one end of the wall on one of the measurement marks. Then carefully wrap the chalk line around the panel pin and extend it to the other end of the wall which you have already marked. Double check that your chalk line is lined up accurately and whilst it is pulled fairly tight snap it back in place against the wall. This will give you a clear mark across the wall that will serve as your guideline for fitting the coving.
Once you have a clear guideline, hammer in your panel pins every 35/40 centimetres along the chalk line (making sure to check for any pipes or cables beforehand). You should also ensure that the cut section of your coving is in place to ensure proper fitting.
Take your adhesive and apply it carefully to the back of your coving along the edges. You don’t have to apply the adhesive at the centre of the coving since it won’t come in contact with any surface.
Carefully lift coving onto the top of your panel pins that you hammered into the wall in step 3 and push it firmly. Make sure that it is in a straight line and nothing gets out of your chalk line.
Take your time to get rid of the excess adhesive on the coving. You can accomplish this step using a damp piece of cloth and a palette knife.
Once you have removed the excess adhesive, apply a thick bead of filler to the bottom and top edges of the coving. Use a damp sponge to smooth the filler so that your edges remain clean.
Allow your filler some time to dry up. Once it has dried up, you can use sandpaper to sand it until it is entirely smooth.
Cutting coving and cornice corners and mitres is slightly trickier however it is still definitely achievable without having to get the professionals in.
For this step, it helps if you have a mitre box. We have 3 different mitre boxes to suit all sizes of coving which are ideal for cutting internal and external corners.
The videos below provide step by step instructions on how to cut the internal and external corners of coving and cornice.
If you need to stop the coving before a staircase slope or you just need to stop at one end then you need to cut a stop end mitre. The video below demonstrates how to do this.
ORAC have also produced their own how to install lightweight coving and cornice guide which provides images and further information regarding cutting coving, alongside which adhesive is best for your job.
If you’re looking to upgrade or replace broken coving, view our own selection of lightweight coving & decorative cornices.
Coving is a decorative moulding that runs along the junction of the wall and ceiling, adding a finished look and hiding imperfections. Installing coving allows you to achieve remarkable interior design.
Common materials include plaster, polystyrene, polyurethane, and MDF. Each has different benefits in terms of durability, cost, and ease of installation.
Many lightweight coving types (e.g., polystyrene or polyurethane) are DIY-friendly, while heavier plaster coving may require professional installation.
Typically, you need a mitre box, saw, adhesive, measuring tape, pencil, and filler for gaps. We would also recommend having sandpaper, spirit level, chalk line, hammer and panel pins.
Measure the walls accurately and use a mitre box to cut angles precisely for external and internal corners, and mitres.
The adhesive depends on the material—lightweight coving can be fixed with a strong grab adhesive, while plaster coving may need coving adhesive or screws for extra support. It is also important to consider what room you are installing your coving in. Bathrooms, for example, require specific adhesive.
Some coving comes pre-primed, but others may need priming before painting for a smooth finish. All of our lightweight coving ranges come pre-primed for painting.
Make sure the surfaces are clean and dry, apply adhesive evenly, and hold in place for a few minutes to allow it to bond.
Internal and external corners require precise cuts using a mitre box. You can also use pre-made corner pieces if available.
Use decorators’ caulk or filler to smooth out any gaps before painting.
Yes, coving can be painted with emulsion or eggshell paint to match your décor.
Carefully score along the edges with a knife and gently pry it off with a scraper, taking care to avoid excessive wall damage.

25th March 2024
Our Glasgow showroom will be closing for Easter holiday at 4pm on Wednesday 16th April and shall re-open on Tuesday...
Easter Holiday 2025
27th July 2020
Wall panels are both decorative and functional. They are perfect for creating character within the interior of your home. Our...
Wall Panel InspirationYou've selected some products for comparison. Click here to compare the products you've selected.
View Products")
")
")

")


